
Salads
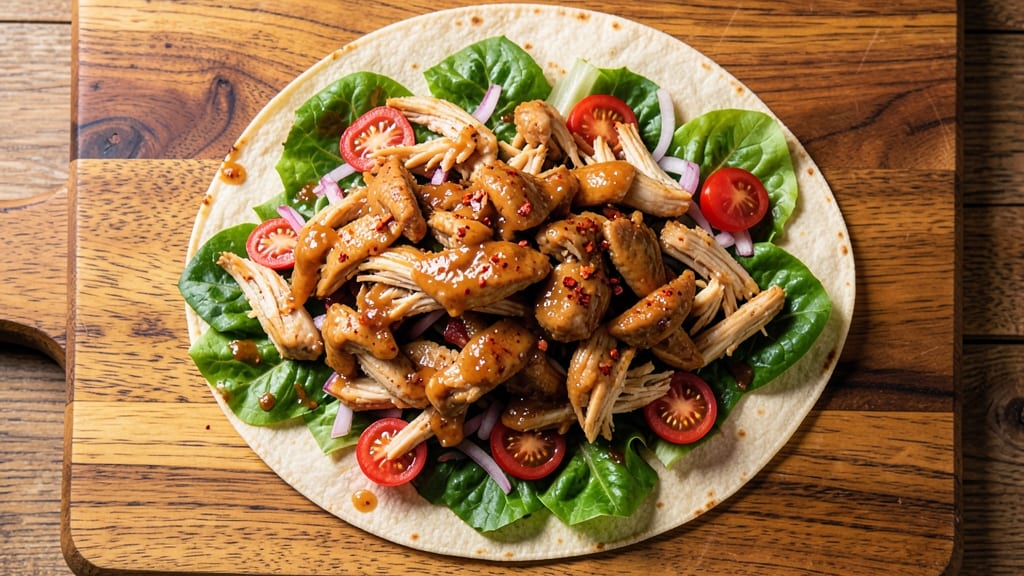
This buffalo chicken salad wrap recipe delivers the perfect balance of spicy heat, creamy tang, and satisfying crunch—all wrapped in a sturdy tortilla. 🔥 I developed this recipe during a busy week when I needed a meal that could be prepped ahead and eaten on the go, but still tasted like it came from a restaurant.
The secret lies in tender, well-seasoned chicken tossed in a bold buffalo sauce, paired with crisp vegetables and a creamy dressing that ties everything together.
The process is straightforward but delivers restaurant-quality results. You'll start by cooking the chicken in a flavorful marinade, then tossing it with a homemade buffalo sauce that packs a punch without overpowering the other ingredients.
The salad base combines crisp lettuce, juicy tomatoes, and crunchy celery, while a creamy ranch dressing adds that cool, tangy contrast to balance the heat. The final touch? Wrapping it all in a toasted tortilla for that satisfying crunch that keeps every bite exciting.
What you'll end up with is a wrap that's hearty enough to be a main dish but light enough to enjoy for lunch or a quick dinner. The buffalo chicken stays tender and flavorful, the vegetables add freshness, and the tortilla provides structure without being overwhelming.
It's the kind of recipe that's perfect for meal prepping—make a batch on Sunday and have satisfying lunches all week long. The combination of textures and flavors makes it impossible to eat just one.
Serve these wraps with a side of cool ranch or blue cheese dressing for dipping, and you've got a meal that's as satisfying as it is convenient. Whether you're feeding a crowd or packing lunches for work, this recipe delivers big flavor without the fuss.
Let's get started on creating wraps that are sure to become a favorite.
Ingredients for buffalo chicken salad wrap
Fourteen ingredients for a restaurant-worthy wrap that's spicy, creamy, and packed with crunch.
| Ingredient | Amount | Notes |
|---|---|---|
| Boneless, Skinless Chicken Breast 🍗 | 1 ½ lb | Cut into bite-sized pieces |
| Hot Sauce 🌶️ | ½ cup | Frank's RedHot preferred |
| Butter 🧈 | ½ cup | Unsalted, melted |
| Large Tortilla Wraps 🌯 | 4 whole | Flour or spinach tortillas |
| Romaine Lettuce 🥬 | 1 head | Chopped into bite-sized pieces |
| Cherry Tomatoes 🍅 | 1 cup | Halved, seeded |
| Celery Sticks 🥬 | 2 cups | Thinly sliced |
| Blue Cheese Crumbles 🧀 | ½ cup | For topping |
| Ranch Dressing 🥛 | ½ cup | Store-bought or homemade |
| Garlic Cloves 🧄 | 2 cloves | Minced for marinade |
| Lemon Juice 🍋 | 1 tbsp | Freshly squeezed |
| Salt 🧂 | 1 tsp | Kosher or sea salt |
| Black Pepper 🌶️ | ½ tsp | Freshly ground |
| Olive Oil 🫒 | 1 tbsp | For tortilla toasting |
The chicken needs to stay tender, so boneless, skinless breasts are your best bet—cut them into even pieces so they cook at the same rate. Frank's RedHot is my go-to for that classic buffalo heat, but any good-quality hot sauce works. For the butter, unsalted is key—you're already adding salt separately. If you're prepping ahead, cook the chicken and store it in the fridge for up to 3 days before assembling the wraps. The tortillas? Spinach tortillas add a nice pop of color, but flour works just as well. Just don't skip toasting them—the crispy edge makes all the difference.
No hot sauce? Mix 1 tbsp cayenne + 1 tbsp apple cider vinegar + 1 tbsp maple syrup for a quick substitute. The ranch dressing can be store-bought (Hidden Valley is reliable), but homemade is worth it if you've got time—just blend mayo, buttermilk, garlic powder, and dill. For extra crunch, swap half the celery for crunchy pickles or jicama sticks. The blue cheese is optional but adds that tangy kick that balances the heat. If you're sensitive to dairy, vegan blue cheese crumbles work in a pinch. And if you're making these ahead, keep the dressing separate until serving so the lettuce stays crisp.
These wraps are meal-prep gold. Assemble them, wrap tightly in foil, and they'll keep in the fridge for 2 days. For longer storage, freeze the filled wraps (unwrapped) for up to 1 month. When reheating, microwave for 30 seconds to crisp up the tortilla. The buffalo chicken stays juicy, but if it dries out, just add a splash of ranch or hot sauce when reheating. Pro tip: Toast the tortillas fresh before wrapping if you're prepping ahead—they crisp up better that way. Leftovers? Toss them in a salad or eat cold for a refreshing lunch the next day.
Why You'll Love This Recipe
- No-Fail Weeknight Win: I swear by this when I’ve got 20 minutes and zero energy—just shred the cooked chicken, toss it with hot sauce and butter, and you’re already halfway there. The tortillas stay fresh for days, so it’s my go-to when I’d rather be scrolling than cooking.
- Spicy-Creamy Magic: That tangy heat from the hot sauce mixed with the rich butter? It’s the kind of flavor combo that makes you take an extra bite. Honestly, I’ve tried store-bought versions, and this one always wins—crispy-edged chicken with a creamy kick inside.
- Lunchbox Hero: Between us, this is my secret weapon for packed lunches. Wrap it up with romaine, and it holds together like a dream—no soggy messes here. My kids actually eat their veggies when they’re hidden in this, and that’s saying something.
- Budget Meal Stretch: A single chicken breast feeds four wraps, and the tortillas cost pennies. I’ll be real: this is how I feed my family for under $10 and still feel like I’m treating them. Leftovers? Even better—just reheat the filling and wrap fresh.
Step-by-step instructions for buffalo chicken salad wraps
Here's how to make these crispy, spicy wraps with perfect texture every time.
🍳 Step 1: Cook the Spicy Buffalo Chicken
In a large skillet, melt the 0.5 cup butter over medium-high heat. Add the 1.5 lb boneless, skinless chicken breast cut into bite-sized pieces and cook for 5-6 minutes until the chicken is no longer pink in the center.
Reduce heat to medium and stir in the 0.5 cup hot sauce and 2 cloves minced garlic. Let the mixture simmer for 3-4 minutes until the sauce thickens slightly and coats the chicken. The chicken should be tender and the sauce should have a glossy, slightly sticky consistency. Here's the thing—don't overcook the chicken or it'll turn rubbery. You want it juicy and tender with that perfect spicy kick.
👨🍳 Step 2: Prepare the Crunchy Tortillas
While the chicken cooks, heat a clean skillet over medium heat. Lightly brush each of the 4 whole large tortilla wraps with the 1 tbsp olive oil on both sides. Place one tortilla in the skillet and cook for 30-45 seconds per side until golden brown and crispy. Repeat with the remaining tortillas, stacking them on a wire rack to keep them crisp as they cool.
I like to keep these warm in a 200°F oven while I assemble the wraps. This ensures they stay crispy when you're ready to wrap everything up. If you skip this step, your tortillas will get soggy from the wet ingredients.
🥘 Step 3: Assemble the Fresh Vegetable Mix
In a large bowl, combine the 1 head chopped romaine lettuce, 1 cup halved cherry tomatoes, and 2 cups thinly sliced celery sticks. Drizzle with the 0.5 cup ranch dressing and toss gently to coat. Add the 1 tbsp lemon juice and mix again. The dressing should lightly coat the vegetables without making them soggy—this is your base for the perfect crunchy texture.
Real talk: don't skip the lemon juice. It brightens up the flavors and cuts through some of the richness from the ranch and butter. The vegetables should look vibrant and slightly glistening from the dressing.
🔥 Step 4: Combine and Wrap It Up
Divide the spicy chicken mixture evenly among the 4 crispy tortillas. Spoon about ¼ of the vegetable mix onto each chicken portion, spreading it out evenly. Sprinkle each wrap with 2 tablespoons of blue cheese crumbles—that's 0.5 cup total—and fold the sides inward before rolling tightly from the bottom up.
I like to seal the wraps with a little extra ranch dressing brushed on the outside—this helps them hold together better and adds a nice finishing touch. Wrap them in parchment paper to keep them contained while you serve.
🍽️ Step 5: Serve Immediately for Maximum Crunch
Slice each wrap diagonally into 2 pieces and serve immediately. The contrast of crispy tortilla, spicy chicken, cool ranch, and creamy blue cheese is what makes these wraps so addictive. Serve with extra hot sauce on the side if you want to crank up the heat!
Here's the moment that matters: the first bite should deliver that perfect combination of textures—crunchy tortilla, tender chicken, crisp vegetables, and creamy blue cheese. Don't let them sit too long or the tortillas will lose their crispness. Enjoy while they're warm!
Pro Tips For Making Buffalo Chicken Salad Wrap
- CRANK THE HEAT FIRST: Start your chicken on high heat in the pan—no babying it. I used to simmer it gently, and the sauce would just pool instead of clinging. Once it’s seared on both sides, pull it down to medium-low to finish cooking, or you’ll end up with a sad, overcooked mess.
- CUT CHICKEN SMALL AFTER COOKING: Shred or dice the chicken after it’s fully cooked, not before. Cold chicken fights the knife, and you’ll end up with uneven pieces that don’t soak up the buffalo butter like they should. Let it rest a minute first—hot chicken is easier to handle, and the texture stays consistent.
- DON’T SKIP THE BUTTER MELT: Mix the hot sauce with melted butter, not cold. I learned this after my first batch tasted like vinegar on a bun. Warm the butter first, then stir in the hot sauce and a pinch of salt—this keeps the sauce smooth and clingy, not greasy or watery.
- WRAP THEM WRONG SIDE DOWN: Place the tortilla rough side up (the side that wasn’t against the wrapper) when assembling. It’s less likely to tear when you roll it, and the texture stays intact. I’ve seen too many wraps split open mid-bite because someone ignored this tiny detail.
Essential equipment for this dish
Skillet Essentials
You’ll need a large, heavy-bottomed skillet—I swear by my Lodge cast iron—to cook the buffalo chicken. The thick base distributes heat evenly, preventing hot spots that can burn your chicken or sauce.
A 10-inch or 12-inch pan works best for this recipe, giving you enough space to toss the chicken without overcrowding. If you don’t have cast iron, a stainless steel skillet with a lid is a great alternative. 🔥
For crisping the tortillas, grab a clean, dry skillet—no need for anything fancy here. A non-stick skillet works perfectly, but if you’re using cast iron, make sure it’s well-seasoned to prevent sticking.
I avoid preheating the tortillas in the oven unless you’re prepping ahead, as the skillet method gives you better control over the crispiness. Pro tip: Use a spatula with a thin, flexible edge to flip the tortillas—it’s easier to handle than a wide spatula.
Prep Tools
A sharp chef’s knife and cutting board are non-negotiable for chopping the chicken, lettuce, and celery. I recommend a Wüsthof or Victorinox for precision—dull knives make prep frustrating and unsafe. For mincing the garlic, a garlic press saves time, but a knife works if you’re comfortable with it.
A microplane can also work for fine garlic mincing, though it’s overkill for this recipe. 🧄
For assembling the wraps, a large mixing bowl (at least 8-inch diameter) keeps everything contained while tossing the salad. A spoon or spatula helps distribute the ranch dressing evenly without over-soaking the veggies.
I also keep a small bowl nearby for the blue cheese crumbles—it’s easier to sprinkle them evenly from a shallow dish. If you’re prepping ahead, grab parchment paper or foil to wrap the assembled (but uncooked) tortillas for storage.
Optional Upgrades
If you’re feeling fancy, a mandoline speeds up slicing the celery and tomatoes, but a sharp knife works just fine. For extra crunch, toast the tortillas in a toaster oven set to 375°F for 2-3 minutes—it’s foolproof for even browning.
A wire cooling rack keeps the tortillas crisp while they cool, but a clean plate works in a pinch. For serving, a large platter or cutting board makes it easy to slice the wraps diagonally without a mess. 💡
No fancy tools? No problem. A skillet, knife, and bowl are all you truly need. The key is keeping your chicken tender and your tortillas crisp—those two elements make or break the wrap.
Invest in a good cast iron skillet if you don’t have one; it’s the most versatile tool in your kitchen and will last forever. And if you’re meal prepping, a set of airtight containers keeps the wraps fresh for days.
Nutrition facts
Frequently asked questions
Can I use rotisserie chicken instead of cooking fresh?
Rotisserie chicken saves time and works beautifully. Just shred 1.5 cups of cooked chicken and toss it with 2 tablespoons hot sauce and 2 tablespoons melted butter to mimic the buffalo flavor. This cuts prep time by 20 minutes while keeping the same delicious result.
How do I make these wraps less spicy?
Reduce the hot sauce by half (0.25 cup instead of 0.5 cup) or replace 2 tablespoons with mild BBQ sauce. For extra creaminess, add 1 tablespoon sour cream to the chicken mixture. If it's already cooked, balance the heat with more ranch dressing or blue cheese crumbles.
Can I make these ahead of time?
Yes! Assemble the wraps (without wrapping them) and refrigerate in an airtight container for 24 hours. To serve, toast the tortillas in a dry skillet for 30 seconds per side and wrap fresh. For freezing, wrap each filled tortilla in foil and freeze for up to 1 month. Thaw overnight in the fridge before reheating.
What's the best tortilla for this recipe?
Flour tortillas (like Mission or La Tortilla Factory) are ideal—they hold up best to the wet ingredients. For extra flavor, try spinach or whole wheat tortillas. Avoid low-carb or overly thick tortillas, as they won't crisp properly. Pro tip: Toast tortillas fresh before assembling for maximum crunch!
How do I fix soggy tortillas?
If tortillas lose crispness, reheat them in a dry skillet for 15-20 seconds per side or wrap in a damp paper towel and microwave for 10 seconds. For future meals, keep wet ingredients separate until serving or use a tortilla press to create an extra-sturdy wrap. The key is assembly speed—work quickly to minimize sogginess!